MVVM (Model-View-ViewModel) is an architectural coding pattern for structuring SwiftUI views. The goal of the pattern is to separate the view definition from the business logic behind it. Your views will not depend on any specific model type if done correctly.
While MVVM was mostly used in the UIKit/AppKit days, it’s still a commonly used pattern in SwiftUI. In my experience, how it’s being used isn’t always consistent and results more in a View-ViewModel pattern. However, this might be justified considering ‘overengineering’. Let’s dive in!

What is the MVVM architectural pattern?
MVVM is an acronym for Model-View-ViewModel and was originally invented by Microsoft architects. Developers use it to create separation of concern, ensuring a view is not tight to a specific model type. This results in more reusable code as you can use your view with any model if there’s a view model in-between to provide a communication layer.
Visually, the pattern looks as follows:
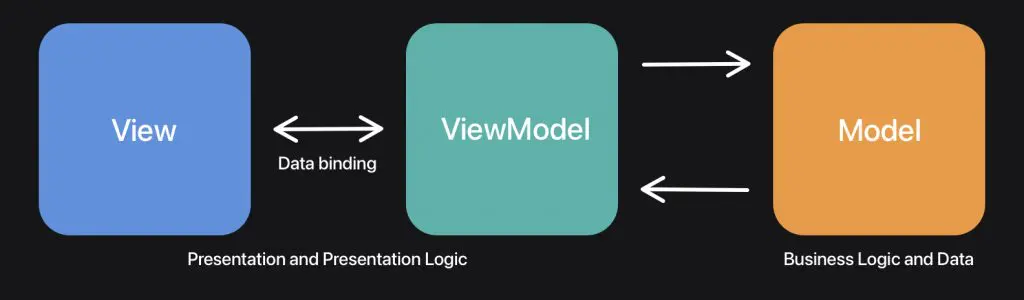
The pattern consists of three layers:
- View
This is the view definition. In SwiftUI, this would be your declarative view definition. - ViewModel
The view directly binds to properties on the view model to send and receive updates. Since the view model has no reference to the view, it becomes reusable for use with multiple views. - Model
A model refers to a domain model. For example, aContactViewwould have aContactViewModelthat acts as a communication layer with aContactdomain model.
You don’t always have to use a Model to work with MVVM. The model could also be a data access layer, e.g., a remote content cache. To efficiently use the pattern, I like to think about a few critical rules:
- The View only communicates with the ViewModel
- The View does not know anything about the (domain) model behind the ViewModel
- The ViewModel has no reference to the View and becomes reusable to be used with any View
Ensuring your code respects these rules will automatically create more reusable, testable, and isolated code.
How to use MVVM in SwiftUI
Now that we know how MVVM works and what it stands for, it’s time to put it into practice. We discussed the contact view earlier, so let’s use that in this example.
Without using MVVM, your ContactView might look as follows:
struct Contact {
    let name: String
}

struct ContactView: View {

    let contact: Contact

    var body: some View {
        VStack {
            Text("Name: \(contact.name)")
            Button("Delete", action: deleteContact)
        }
    }

    func deleteContact() {
        // Perform contact deletion
    }
}
At this stage, the code might be perfectly fine. There’s not a lot of code yet, and there’s also not too much business logic to take care of. However, the ContactView is strictly connected to the Contact model and contains business logic for deleting contacts. It’s also not easily testable or reusable with other similar types.
We can rewrite this logic by making use of the MVVM architectural coding pattern. To gracefully migrate, we start by only connecting the metadata with a new ContactViewModel type:
struct ContactViewModel {
    /// A public accessor to the contact's name.
    /// Implementors don't know the name is coming from a `Contact` type.
    var name: String { contact.name }

    /// Keep a reference to the (domain) model so we can perform any actions like deleting.
    private let contact: Contact

    /// The ViewModel only references the `Contact` model, but has no link to the view that's using the ViewModel.
    init(contact: Contact) {
        self.contact = contact
    }
}
We can now update our ContactView to make use of this new ViewModel:
struct ContactView: View {

    let viewModel: ContactViewModel

    var body: some View {
        VStack {
            Text("Name: \(viewModel.name)")
            Button("Delete", action: deleteContact)
        }
    }

    func deleteContact() {
        // Perform contact deletion
    }
}
This is already a great improvement since we removed the direct connection between the model and the view.
Extracting the business logic from the view
The next step is to extract the business logic from the view. Honestly, many developers use different implementations for this. I prefer to write the deletion logic inside the ViewModel, but the pattern originally describes implementing deletion inside the Contact model. Even better would be to use the Repository Pattern here to extract away the business logic into a single responsible type, resulting in a ViewModel, which is only a communication layer.
I leave it up to you what you prefer best, but for this article, I’m going to move the deletion business logic into the ViewModel. This is already a great improvement as it removes the business logic from the View.
struct ContactView: View {

    let viewModel: ContactViewModel

    var body: some View {
        VStack {
            Text("Name: \(viewModel.name)")
            Button("Delete", action: viewModel.deleteContact)
        }
    }
}

struct ContactViewModel {

    /// ...

    func deleteContact() {
        // Perform contact deletion
    }
}
The final ContactView implementation is no longer connected to a specific model or business logic. It only communicates with our ViewModel, which acts as a communication layer between the view and the model.
Using protocols to increase the reusability of views with MVVM
The MVVM implementation made our view simpler and less dependent, but we can take it one step further by making use of protocols. So far, we’ve only had to work with a Contact structure, but it could be that your project requires another type of contact, e.g., RemoteContact.
By making use of protocols, you will allow your views to become more flexible. To do this, we start by creating a ContactViewModel protocol:
protocol ContactViewModel {
    var name: String { get }

    func deleteContact()
}
We don’t have to update our View, since it’s already communicating with the same type name, but we do need to rename our original ContactViewModel to LocalContactViewModel. It also has to conform to the ContactViewModel protocol:
struct LocalContactViewModel: ContactViewModel {
    var name: String { contact.name }
    private let contact: Contact

    init(contact: Contact) {
        self.contact = contact
    }

    func deleteContact() {
        // Perform contact deletion **locally**.
    }
}
Finally, we can start defining a new RemoteContactViewModel which will act as a communication layer between the ContactView and RemoteContact:
struct RemoteContact {
    let name: String
}

struct RemoteContactViewModel: ContactViewModel {
    var name: String { contact.name }
    private let contact: RemoteContact

    init(contact: RemoteContact) {
        self.contact = contact
    }

    func deleteContact() {
        // Perform contact deletion **remotely**.
        // Potentially using a network request.
    }
}
The benefit of using protocols like this is that it allows you to instantiate the same ContactView with multiple types of ViewModels, that communicate with different (domain) models:
let localViewModel = LocalContactViewModel(contact: Contact(name: "Antoine"))
let remoteViewModel = RemoteContactViewModel(contact: RemoteContact(name: "Antoine"))

/// We use the same `ContactView`, but different `ContactViewModel` types.
let localContactView = ContactView(viewModel: localViewModel)
let remoteContactView = ContactView(viewModel: remoteViewModel)
We’ve created reusable and testable code and set us up for scalability in the future.
Thoughts on over-engineering: should I always use view models?
The example in this article might have made you think about over-engineering: should I use MVVM for simple views like this?
It’s a fair question, and there are different ways to answer it. I prefer to start small and optimize when needed. You could define a simple ContactView at first and migrate it to an MVVM-supported layer once your project grows. However, if you expect your project to grow or want to create a consistent implementation across your project, you might want to use MVVM from the start.
It’s also important to take into account any colleagues working on the same project. By reusing similar patterns across the project, code becomes easier to understand. Even for colleagues that didn’t work on the ContactView, they will easily understand the code as they recognize the MVVM pattern from other places in the project.
Conclusion
MVVM (Model-View-ViewModel) is an architectural pattern that allows you to structure your SwiftUI views, data layer, and business logic. It’s a popular pattern but used differently depending on the developers’ preference. Following strict rules makes your code more testable, reusable, and easier to understand.
If you want to improve your SwiftUI knowledge, even more, check out the SwiftUI category page. Feel free to contact me or tweet me on Twitter if you have any additional tips or feedback.
Thanks!