Memory consumption can quickly increase if you load many images from the disk using UIImage. You’ll generally load images from a remote address or via an asset catalog. However, you have bundled images in some cases, and you need to load them directly from a bundle path.
In those cases, you’ll need to use UIImage or NSImage since SwiftUI does not support loading images directly from a path. There are several convenient options to do so, but their underlying caching mechanism might not always be clear. Let’s dive into the details.

How memory consumption increases rapidly when loading images from disk
Before we get into the details, I’d love to draw the problem using a code example. Imagine having 200 images on disk inside a bundled folder, which we stride using a SwiftUI Slider:
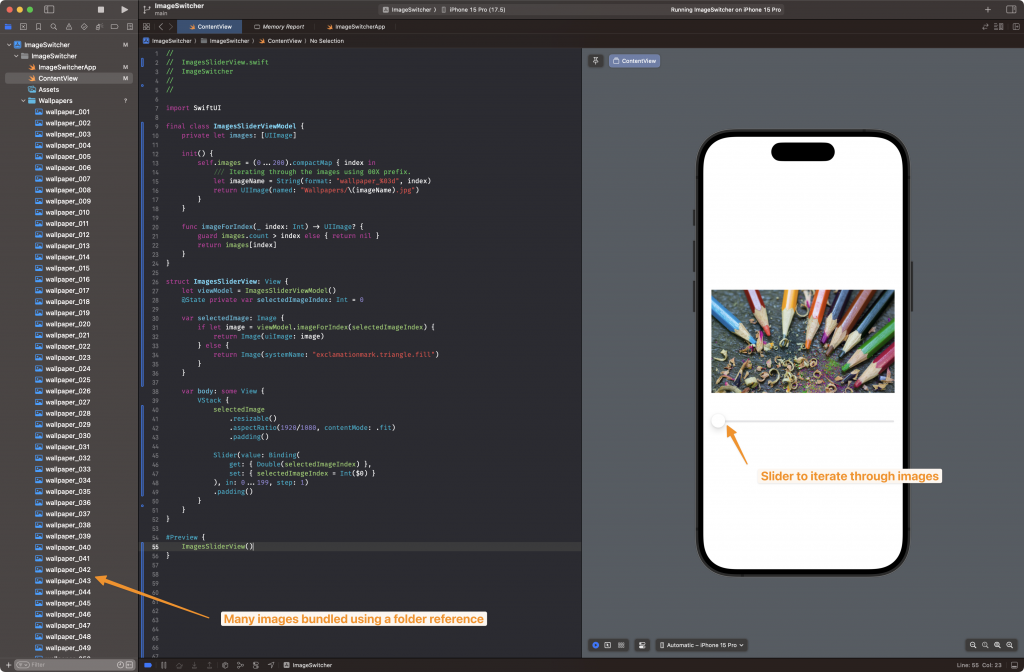
This scenario could be possible if your app bundles many images for direct usage after installation. In this case, we have 200 wallpapers for the user to iterate through, loaded from disk using UIImage:
self.images = (0...200).compactMap { index in
    /// Iterating through the images using 00X prefix.
    let imageName = String(format: "wallpaper_%03d", index)
    return UIImage(named: "Wallpapers/\(imageName).jpg")
}
The slider updates the selected image index and our image preview updates accordingly:
struct ImagesSliderView: View {
let viewModel = ImagesSliderViewModel()
@State private var selectedImageIndex: Int = 0
var selectedImage: Image {
if let image = viewModel.imageForIndex(selectedImageIndex) {
return Image(uiImage: image)
} else {
return Image(systemName: "exclamationmark.triangle.fill")
}
}
var body: some View {
VStack {
selectedImage
.resizable()
.aspectRatio(1920/1080, contentMode: .fit)
.padding()
Slider(value: Binding(
get: { Double(selectedImageIndex) },
set: { selectedImageIndex = Int($0) }
), in: 0...199, step: 1)
.padding()
}
}
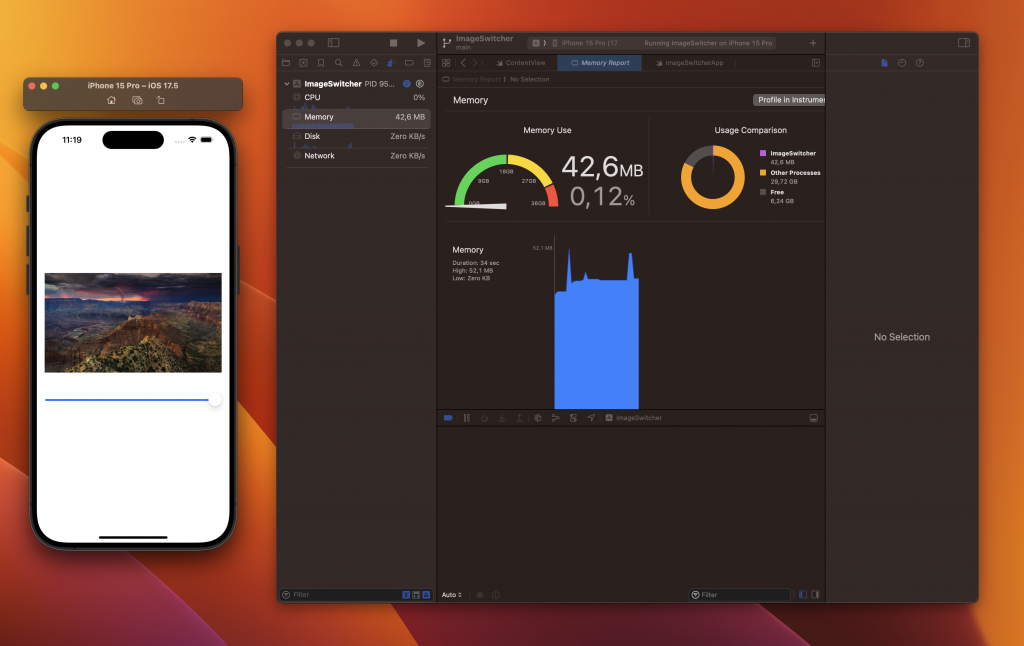
}While nothing seems wrong at first, there’s a significant memory consumption problem when running the app and iterating through the images:
You can open the memory reporter inside the Debug navigator tab. When debugging memory issues, there are a few things to consider:
- Use the memory graph debugger to pinpoint the memory increase. In our case, it’s clear that the increase happens after sliding through images, so we should focus on image consumption.
- Find out who’s responsible for increasing the memory. It could be an internal caching mechanism or code you wrote that holds a reference to the image memory.
With that in mind, let’s try to solve the memory issue.
Consider whether you need to store images in memory
The first thing you should consider is whether storing the images in memory is required. This could be the case if:
- Images are only shown sometimes. In our case, the slider iterates quickly, so the images are not shown often.
- There’s no processing taking place before displaying the image. If you process images, caching is beneficial to prevent processing an image multiple times. An example could be resizing an image before displaying it.
If you decide there’s no need for caching, you can continue by removing the images array and creating a static accessor instead:
struct StaticImagesSliderView: View {

    @State private var selectedImageIndex: Int = 0

    var selectedImage: Image {
        if let image = imageForIndex(selectedImageIndex) {
            return Image(uiImage: image)
        } else {
            return Image(systemName: "exclamationmark.triangle.fill")
        }
    }

    var body: some View {
        VStack {
            selectedImage
                .resizable()
                .aspectRatio(1920/1080, contentMode: .fit)
                .padding()

            Slider(value: Binding(
                get: { Double(selectedImageIndex) },
                set: { selectedImageIndex = Int($0) }
            ), in: 0...199, step: 1)
            .padding()
        }
    }

    func imageForIndex(_ index: Int) -> UIImage? {
        let imageName = String(format: "wallpaper_%03d", index + 1)
        return UIImage(named: "Wallpapers/\(imageName).jpg")
    }
}
While this code works, there’s an important caveat that you might not expect. Quoted from the UIImage documentation:
If you intend to display an image only once and don’t want it added to the system’s cache, create it using the
imageWithContentsOfFile:method instead. Keeping single-use images out of the system image cache can potentially improve the memory use characteristics of your app.
Our memory still increases rapidly since we’re using UIImage(named: ). We can solve this by adjusting the imageForIndex(_: ) method:
func imageForIndex(_ index: Int) -> UIImage? {
    let imageName = String(format: "wallpaper_%03d", index + 1)

    /// Get the propery file path reference from our main bundle:
    guard let imagePath = Bundle.main.path(forResource: "Wallpapers/\(imageName).jpg", ofType: nil) else {
        return nil
    }

    /// Load the image using contents of file to prevent system caching:
    return UIImage(contentsOfFile: imagePath)
}
After running our app and sliding through our images, we can conclude that our memory consumption no longer increases:
Writing a proper image cache to reduce memory usage
Depending on your use case, you might still want to cache images in memory. A common scenario is when you’re processing images before displaying them, such as resizing an image. You don’t want to resize the image multiple times for performance reasons, so being able to cache the result is crucial.
We start by creating a new image cache instance:
struct ImageCache {
    private let cache: NSCache<NSString, UIImage> = NSCache()

    init() {
        cache.countLimit = 50
    }

    subscript(imageName: String) -> UIImage? {
        get {
            cache.object(forKey: imageName as NSString)
        }
        nonmutating set {
            guard let newValue else {
                cache.removeObject(forKey: imageName as NSString)
                return
            }
            cache.setObject(newValue, forKey: imageName as NSString)
        }
    }
}
This is a Swift wrapper around NSCache that will handle caching. We set the maximum cached images to 50 to store only images directly around our selected image index.
We can make use of this cache by rewriting our earlier defined view model:
final class CachedImagesSliderViewModel {
    private let cache = ImageCache()

    func imageForIndex(_ index: Int) -> UIImage? {
        let imageName = String(format: "wallpaper_%03d", index + 1)
        let imagePath = "Wallpapers/\(imageName).jpg"

        if let cachedImage = cache[imagePath] {
            return cachedImage
        } else {
            /// Get the propery file path reference from our main bundle:
            guard let imagePath = Bundle.main.path(forResource: imagePath, ofType: nil) else {
                return nil
            }

            /// Load the image using contents of file to prevent system caching:
            guard let image = UIImage(contentsOfFile: imagePath) else {
                return nil
            }

            /// Perform any processing, e.g. resizing:
            let resizedImage = image.resized()

            /// Cache the image for later re-usage:
            cache[imagePath] = resizedImage

            /// Return the image for current usage:
            return resizedImage
        }
    }
}
You’ll notice the memory consumption is still going up slightly, but it won’t be as high as it was in our initial piece of code. Note that this is a simple implementation of an image cache and there’s room for more improvements:
- You probably want to pre-process images based on the selected index to prevent processing at display time. This will increase your app’s performance. For example, preload
selectedImageIndex + 10images on a background thread. - Processing images can be time-consuming and currently happens on the main thread. Consider moving this to a background thread to unblock UI operations.
Altogether, this should create a more optimized way of working with images loaded from disk.
Conclusion
Loading images from a disk into an in-memory array can increase memory consumption. By rewriting the code using non-system caching APIs, we drastically improved our memory usage. When your app requires image processing, an NSCache-based solution will be helpful.
If you like to improve your Swift knowledge, even more, check out the Swift category page. Feel free to contact me or tweet to me on Twitter if you have any additional tips or feedback.
Thanks!