Core Data got better and better over the years with improved APIs that make it easier to work with. The Apple framework allows you to save your application’s permanent data for offline use, to provide undo functionality or to simply cache data for better performance.
After implementing the basics into your app like using a NSBatchDeleteRequest to delete batches you might need more advanced solutions that can introduce complex bugs. The same thing happened for the Collect by WeTransfer app which I’m developing at my day to day job, so let’s share some experience!
Sharing the same Core Data persistent container with App Extensions
Starting from iOS 13 I recommend Persistent History Tracking as a solution to sharing a single database. You can read more about it in my blog post Persistent History Tracking in Core Data.
Sharing your Core Data database with your Today extension, Action extension or Share extension is something quite common if you’re using Core Data as your database solution. Within the Collect App, we have a Share extension and an Action extension that both require the use of the same underlying persistent container.
The app extension and containing app have no direct access to each other’s container, even though an app extension bundle is nested within its containing app’s bundle. Luckily enough, Apple made it easy to share a persistent container with your extensions.
Setting up the Persistent Container for data sharing
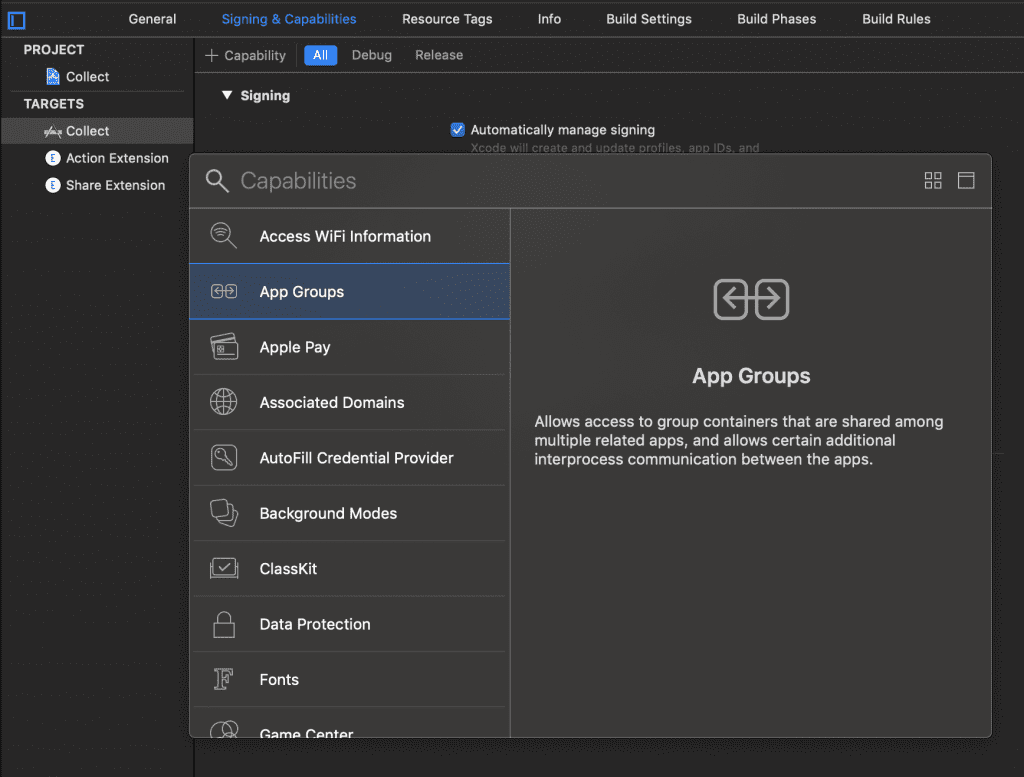
To share data we need to create a shared container between the main app and its extensions. We can do this by adding an app group capability within your projects “Signing & Capabilities” section:

This will eventually result in the following overview of app groups for your project:

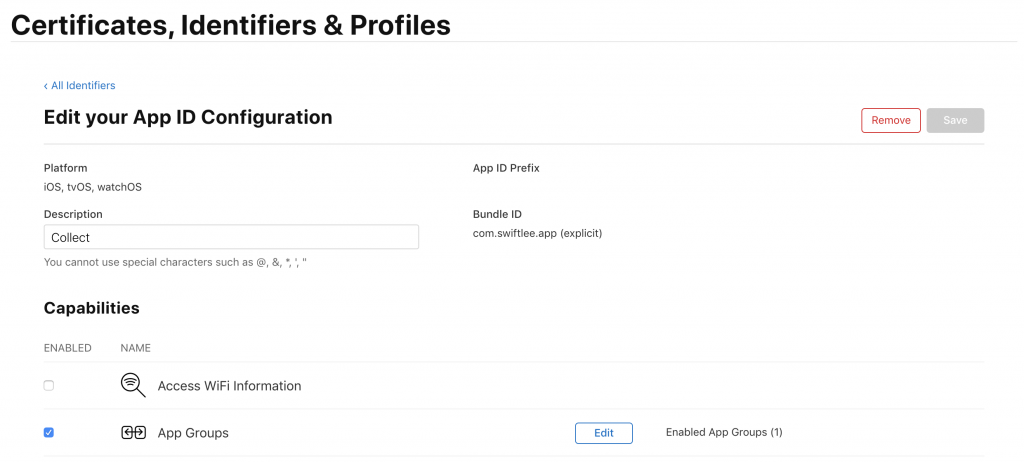
Note that the App Group is turned into red when you didn’t add it to your App Identifier yet. You can do this by logging into your account at https://developer.apple.com/account/resources/identifiers:

After that, you can update your persistent store description. You basically save your database into the shared App Container.
let persistentContainer = NSPersistentContainer(name: "Collect")
let storeURL = URL.storeURL(for: "group.swiftlee.core.data", databaseName: "Coyote")
let storeDescription = NSPersistentStoreDescription(url: storeURL)
persistentContainer.persistentStoreDescriptions = [storeDescription]
For this, we’re making use of a handy URL extension to get the path to the shared container using the security application group identifier.
public extension URL {

    /// Returns a URL for the given app group and database pointing to the sqlite database.
    static func storeURL(for appGroup: String, databaseName: String) -> URL {
        guard let fileContainer = FileManager.default.containerURL(forSecurityApplicationGroupIdentifier: appGroup) else {
            fatalError("Shared file container could not be created.")
        }

        return fileContainer.appendingPathComponent("\(databaseName).sqlite")
    }
}
This will be enough to share your persistent container with your App Extensions. Do make sure to also add your Core Data model to your App Extension targets.
Notifying the main app for Core Data changes in an extension
An important next step is to notify your main app whenever the data has been changed from one of your extensions. This sounds easy but it is quite a challenge as you can’t simply post a notification. An app extension is running in a different process and your main app will therefore not receive any notifications from it.
You could simply refresh your database when your app turns active but that would result in a lot of unneeded refreshes in the case nothing has changed. A better solution instead is to send a Darwin Notification from your app extension to trigger a refresh in your main app.
Using Darwin Notifications for communication between extensions and your main app
Darwin Notifications are able to send and receive between an app extension and the main app. They’re a bit less known but easy to work with once they’re set up.
The best way to get you started is by adding the following DarwinNotificationCenter.swift file to your project. This gives you all the code you need for handling Darwin Notifications.
After that, you need to define two notification names to distinguish between your main app and the app extension. Note that we return this based on whether we’re in an app extension context or not. This is to make sure we post and listen to the right notification.
extension DarwinNotification.Name {
    private static let appIsExtension = Bundle.main.bundlePath.hasSuffix(".appex")

    /// The relevant DarwinNotification name to observe when the managed object context has been saved in an external process.
    static var didSaveManagedObjectContextExternally: DarwinNotification.Name {
        if appIsExtension {
            return appDidSaveManagedObjectContext
        } else {
            return extensionDidSaveManagedObjectContext
        }
    }

    /// The notification to post when a managed object context has been saved and stored to the persistent store.
    static var didSaveManagedObjectContextLocally: DarwinNotification.Name {
        if appIsExtension {
            return extensionDidSaveManagedObjectContext
        } else {
            return appDidSaveManagedObjectContext
        }
    }

    /// Notification to be posted when the shared Core Data database has been saved to disk from an extension. Posting this notification between processes can help us fetching new changes when needed.
    private static var extensionDidSaveManagedObjectContext: DarwinNotification.Name {
        return DarwinNotification.Name("com.wetransfer.app.extension-did-save")
    }

    /// Notification to be posted when the shared Core Data database has been saved to disk from the app. Posting this notification between processes can help us fetching new changes when needed.
    private static var appDidSaveManagedObjectContext: DarwinNotification.Name {
        return DarwinNotification.Name("com.wetransfer.app.app-did-save")
    }
}
We can start observing changes from our app extensions after that:
extension NSPersistentContainer {
    // Configure change event handling from external processes.
    func observeAppExtensionDataChanges() {
        DarwinNotificationCenter.shared.addObserver(self, for: .didSaveManagedObjectContextExternally, using: { [weak self] (_) in
            // Since the viewContext is our root context that's directly connected to the persistent store, we need to update our viewContext.
            self?.viewContext.perform {
                self?.viewContextDidSaveExternally()
            }
        })
    }
}
It’s important to know that these notifications will only be received if your app is actually active in the background. When your app is opened freshly it will obviously fetch the data and this whole notification is not even needed.
The last required step is to actually refresh your data. This comes with a few side effects you need to take into account.
Keeping the data in sync
At WeTransfer, we started at first by simply calling refreshAllObjects() on our view context that refreshes all registered objects. This would normally be enough to update your data but there is a slight side effect to take into account.
The Staleness Interval is used to determine whether an object actually needs to be refreshed or that any available cached data can be reused. This expiration value is applied on a per-object basis and is set to -1 by default. This means that by default, the registered objects were not refreshed at all!
In the end, we ended up with the following refresh method:
extension NSPersistentContainer {

    /// Called when a certain managed object context has been saved from an external process. It should also be called on the context's queue.
    func viewContextDidSaveExternally() {
        // `refreshAllObjects` only refreshes objects from which the cache is invalid. With a staleness intervall of -1 the cache never invalidates.
        // We set the `stalenessInterval` to 0 to make sure that changes in the app extension get processed correctly.
        viewContext.stalenessInterval = 0
        viewContext.refreshAllObjects()
        viewContext.stalenessInterval = -1
    }
}
Note that we reset the staleness interval directly after to make sure we benefit from the cache right after. This was all we needed to keep the data up to date between our app and its extensions.
Conclusion
Using Core Data nowadays is a lot easier than before. Hopefully, with these tips, you manage to keep your data in sync with your extensions as well.
If you need to debug any Core Data issues, you might want to check out my blog post “Core Data Debugging in Xcode using launch arguments”. If you like to improve your Swift knowledge, even more, check out the Swift category page. Feel free to contact me or tweet to me on Twitter if you have any additional tips or feedback.
Thanks!
