Traits allow you to customize or annotate tests using the Swift Testing framework announced at WWDC 2024. They also allow you to configure common behaviors, like runtime evaluated conditions, to skip certain tests.
Before exploring this specific feature of Swift Testing, I encourage you to read my introduction to Swift Testing article. Let’s dive in!

What are traits in Swift Testing?
Using the Swift Testing framework, you can use traits to customize or annotate tests. There are different built-in traits, and you can generate custom ones (expect an article soon!).
We’ll dive deeper into the built-in traits in this article, but let’s first dive into how you can add a trait to a test. We can add a trait by using the @Test macro initializer:
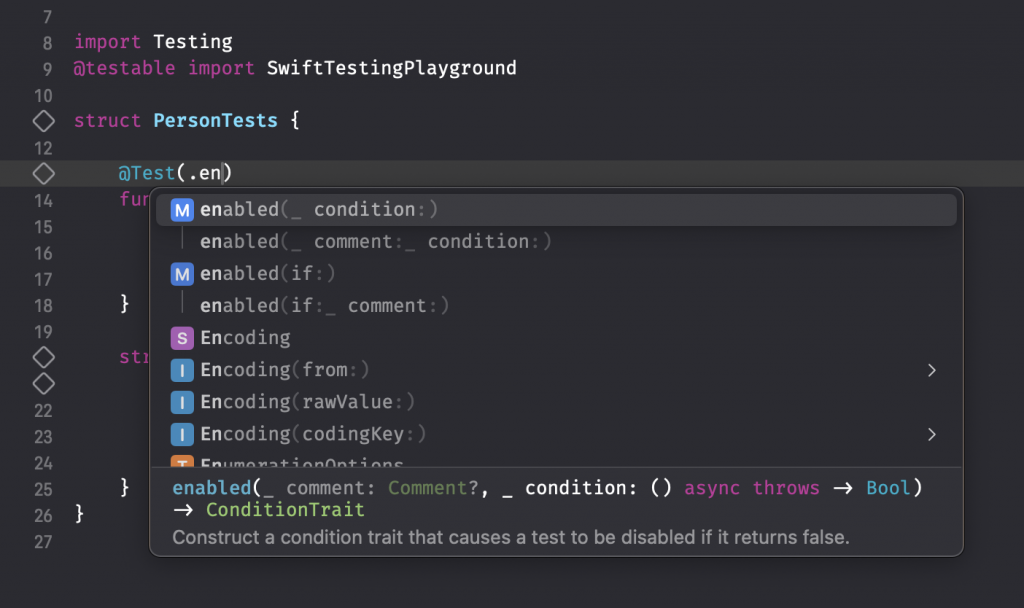
The above example represents an autocompletion for the enabled trait. This trait is a so-called ConditionTrait which is a struct that conforms to the TestTrait and SuiteTrait protocol. This means that you can use the enabled trait on both tests and suites.
If, at any time, you’re curious to know how these traits are implemented, I encourage you to explore the open-source repository swiftlang/swift-testing. Yes, that’s right: the Swift Testing framework is open-sourced, allowing you to contribute and learn from its implementation.
Enabling and disabling tests
When a test is flaky or requires only running in certain conditions, you’ll likely want to enable or disable it based on runtime-evaluated conditions. We can do this using the enabled and disabled condition trait:
@Test(.disabled("This test is flaky and will be solved later."))
func someFlakyTest() {
    /// ...
}
You can use the trait initializer to add a comment explaining why the test is flaky and why it’s disabled.
In the above example, we’ve statically disabled the test. However, you can also decide to disable a test based on a condition:
struct TestHelper {
    static var isRunningOnSimulator: Bool {
        #if targetEnvironment(simulator)
            return false
        #else
            return true
        #endif
    }
}

@Test(.disabled(if: TestHelper.isRunningOnSimulator, "This test will only run on an actual device"))
func testingDeviceOnlyFunctionality() {
    /// ...
}
In this case, we only want the test to run if we run tests against an actual device.
Associating bugs with tests
In my experience, tests are often disabled due to flakiness or a specific bug. Besides adding a comment explaining why you’ve disabled a test, it’s also helpful to reference an open bug ticket for anyone visiting the code in the future. For this, we can make use of the bug trait:
@Test(
    .disabled("This test is flaky and will be solved later."),
    .bug("https://github.com/AvdLee/RocketSimApp/issues/179")
)
func someFlakyTest() {
    /// ...
}
Another common use case is to reference the bug verified by the test:
@Test(
    .bug("https://github.com/AvdLee/RocketSimApp/issues/517", id: 517, "+0% shows in red for build insight")
)
func zeroChangeTextColor() {
    /// Test logic to assert color is black for 0%
}
In the above example, you can see that I’ve written a test to verify the color of a label in RocketSim. I’m a big fan of test-driven bug fixing, where I first reproduce a bug with a unit test. This prevents the bug from reintroducing later and makes it easier for me to verify that a fix worked.
The bug trait enables you to link to a ticket in your bug tracking system, set the ticket ID, and add a descriptive title for the ticket. You’re required at least to provide either the ticket ID or the ticket URL so that the bug shows up in the Test Report:

Swift Testing supports several bug-tracking systems, including Apple’s feedback assistant:
@Test(
    .disabled("No longer works on iOS 18"),
    .bug(id: "FB12345")
)
func waitingForAppleToFixThis() {

}
More info on all supported systems can be found in Apple’s Interpreting Bug Identifiers documentation.
Limiting the running time of tests
In unique cases, you might want to limit the runtime of a specific test. Imagine having a test that uploads certain files, but you want it completed in at least 10 minutes. For this, you can use the timeLimit trait:
@Test(.timeLimit(.minutes(10)))
func uploadFiles() {
    /// ...
}
A few rules apply:
- Setting a time limit on a test suite automatically applies to all the individual test functions and any nested test suites within it.
- When you set a time limit on a parameterized test function, it applies separately to each invocation. This way, if specific arguments cause failures, the successful ones aren’t wrongly marked as failed.
Running tests serially
Finally, you might have tests that influence each other due to a shared resource. For example, I’ve built a backend using Swift & Vapor, and some of my tests run against an actual database. If those tests run in parallel, they will manipulate the underlying database and influence other test results. This eventually results in flaky tests and unreliable behavior.
To solve this, we can mark a suite of tests to run serially:
@Suite(.serialized)
struct SwiftBackendTests {
    /// ...
}
The Swift Testing framework runs tests in parallel by default, which results in much better performance. Therefore, carefully consider whether you should serialize your suite of tests or whether you can rewrite the tests to support running in parallel.
Conclusion
Traits in Swift Testing allow you to annotate and customize test functions. You can disable tests based on conditions, link specific bug-tracker tickets, or set a time limit for long-running tests.
Here are a few more articles for you to make the most out of Swift Testing:
- Parameterized tests in Swift: Reducing boilerplate code
- Using the #require macro for Swift Testing
- Vapor and Swift Testing: Running tests in parallel
- Using the #expect macro for Swift Testing
- Using Traits to annotate and customize test behavior
- Swift Testing: Writing a Modern Unit Test
Thanks!