Parameterized tests allow you to run a single test with multiple input parameters without adding much boilerplate code. For example, you might want to run a unit test for all cases of an enum. You can specify a collection of elements to use as input for the unit test, after which the test will run for each individual argument.
Before we dive into the details, I encourage you first to read my article Swift Testing: Writing a Modern Unit Test so you know how the Swift Testing framework works. This is an advanced framework feature, which is easier to understand if you know the basics. Let’s dive in!

What is a parameterized test?
A parameterized test is a single test invoked for multiple input parameters. By defining a collection of input parameters, you ‘parameterize’ the test. Simply said, you’ll configure the test to re-run for each individual argument.
For example, imagine having an enum of features for your app. In this case, I’m inspired by RocketSim‘s features:
enum Feature {
    case recording
    case darkModeSwitcher
    case deleteDerivedData
    case userDefaultsEditor
    case networkMonitor

    var isPremiumFeature: Bool {
        switch self {
        case .recording, .darkModeSwitcher, .deleteDerivedData:
            return false
        case .userDefaultsEditor, .networkMonitor:
            return true
        }
    }
}
As you can see, we have some features that require a premium subscription, while others are free to use. Without parameterized tests, we would have to define individual tests for each:
struct ParameterizedTests {

    @Test func recordingIsAFreeFeature() {
        #expect(Feature.recording.isPremiumFeature == false)
    }

    @Test func darkModeSwitcherIsAFreeFeature() {
        #expect(Feature.darkModeSwitcher.isPremiumFeature == false)
    }

    /// etc.
}
An obvious improvement would be to use a single test for all free and all pro features:
@Test func freeFeatures() {
    for feature in [Feature.recording, .darkModeSwitcher, .deleteDerivedData] {
        #expect(feature.isPremiumFeature == false)
    }
}

@Test func proFeatures() {
    for feature in [Feature.userDefaultsEditor, .networkMonitor] {
        #expect(feature.isPremiumFeature == true)
    }
}
This is already better, but we can take this one step further by defining the tests as a parameterized test:
@Test("Features are free accessible", arguments: [Feature.recording, .darkModeSwitcher, .deleteDerivedData])
func isFreeAccessibleFeature(_ feature: Feature) {
    #expect(feature.isPremiumFeature == false)
}

@Test("Features are premium", arguments: [Feature.userDefaultsEditor, .networkMonitor])
func isPremiumFeature(_ feature: Feature) {
    #expect(feature.isPremiumFeature == true)
}
At first, you might question yourself why this is so much better. This becomes more obvious once one of your tests starts to fail. Every argument runs as an individual test, which means it will appear as a separate test in the Test Navigator:
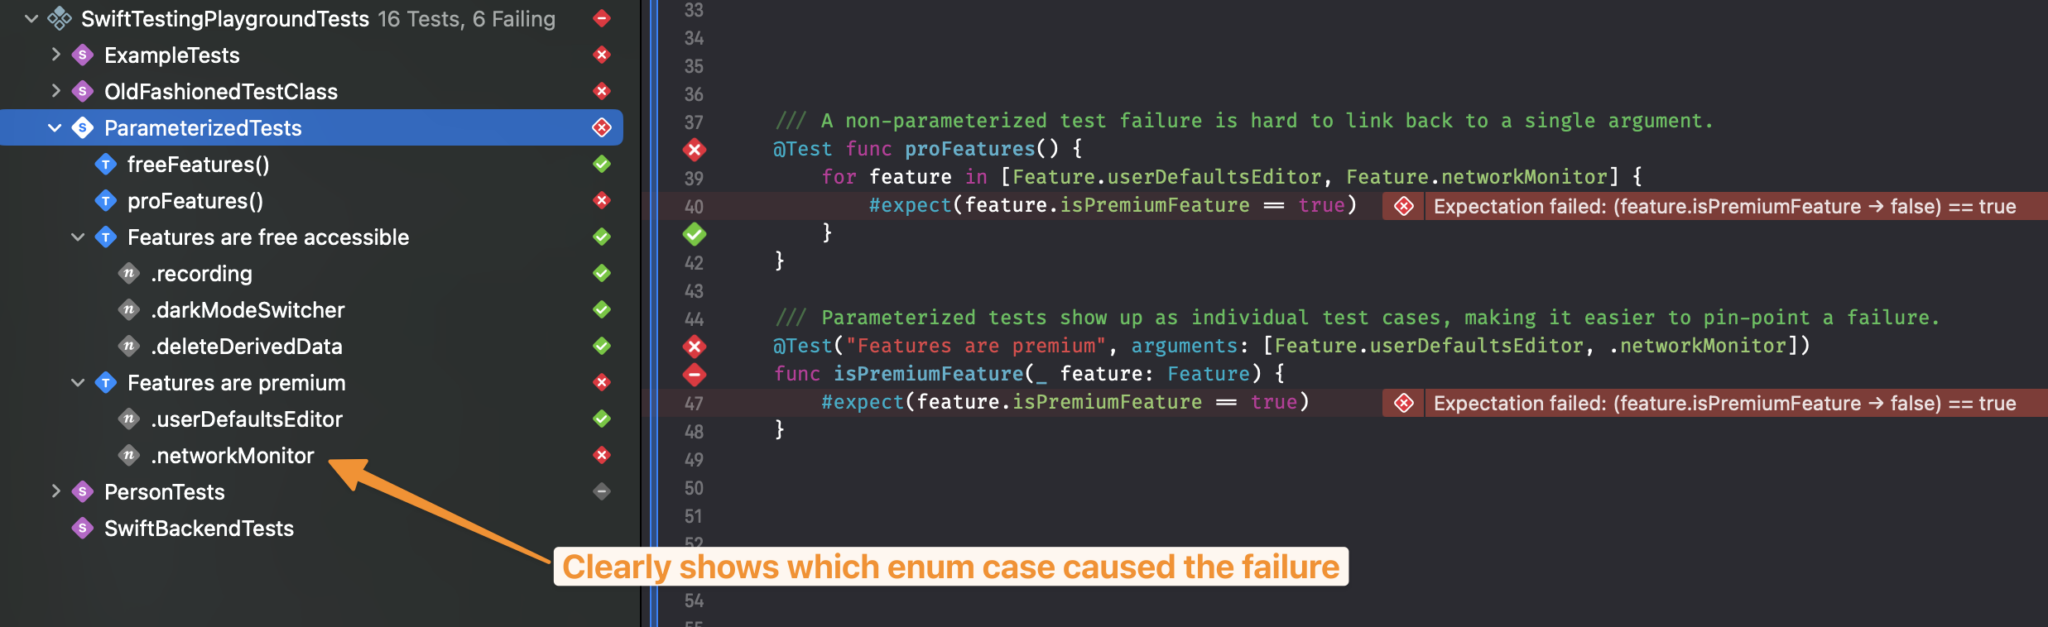
As you can see inside the Test Navigator on the left, the networkMonitor case caused the failure. This truly shows how you can benefit from using parameterized tests in your codebase.
Testing with multiple argument collections
There might be scenarios where you want to run a particular test with multiple collections as arguments. For example, we might introduce several free tries for the premium features:
func isNumberOfTriesWithinFreeLimit(_ tries: Int) -> Bool {
    switch self {
    case .userDefaultsEditor:
        /// Allow users to use the User Defaults Editor 10 times.
        return tries <= 10
    case .networkMonitor:
        /// Allow users to use the Network Monitor 10 times.
        return tries <= 10
    default:
        return true
    }
}
We could write a parameterized test for these using two collections as arguments:
@Test(arguments: [Feature.userDefaultsEditor, .networkMonitor], (0...10))
func testLimitedFreeUsage(_ feature: Feature, tries: Int) {
    #expect(feature.isNumberOfTriesWithinFreeLimit(tries))
}
This results in 2 * 10 individual test cases since we will run the test ten times for each feature argument.
Now, you might think:
“Antoine, isn’t it easier to simply run once for the upper limit of free tries?”
And I hear you!
On top of that, what if one of the premium features has a limit of 5 instead of 10? Right now, that would result in a failure for part of the test cases:
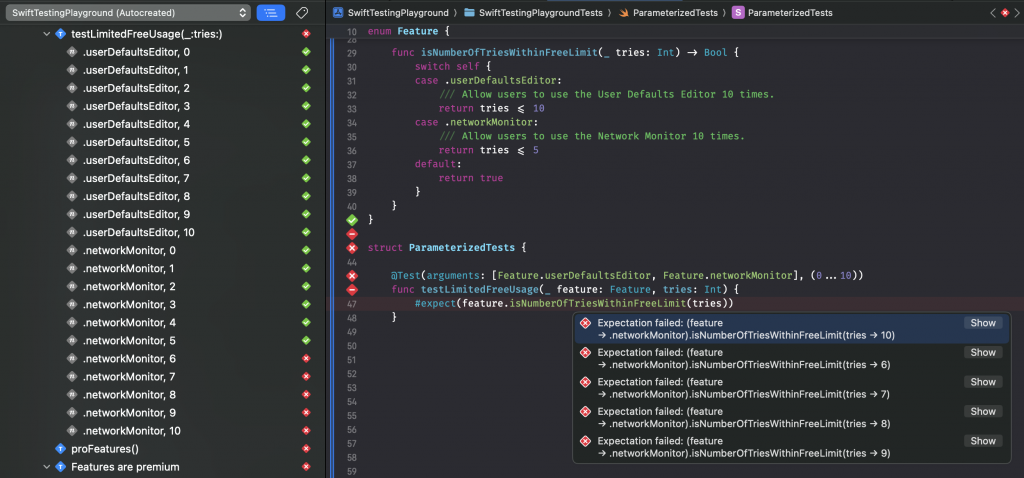
Xcode’s Test Navigator shines again and clearly shows that the network monitor has a limit of 5 free tries instead of 10. It’s time to rewrite our parameterized test, and instead of creating a separate test for the network monitor case, we will update our arguments collections:
@Test(arguments: zip([Feature.userDefaultsEditor, .networkMonitor], [10, 5]))
func testLimitedFreeUsage(_ feature: Feature, tries: Int) {
    #expect(feature.isNumberOfTriesWithinFreeLimit(tries))
}
Note the usage of the zip method to combine the elements of the first array with the elements of the second. In this case, we match the User Defaults Editor argument with 10 and the Network Monitor case with 5. This finally results in reusing a single test which runs twice:
- Once for
Feature.userDefaultsEditorwith a tries of 10 - Once for
Feature.networkMonitorwith a tries of 5
This is an excellent example of how you can benefit from using multiple collections of arguments within a single test case.
Conclusion
Parameterized tests allow you to remove boilerplate code and reuse a single defined test case for multiple arguments. You will have fewer test cases to maintain, and you can use Xcode’s Test Navigator to find out which individual argument caused a failure.
Here are a few more articles for you to make the most out of Swift Testing:
- Parameterized tests in Swift: Reducing boilerplate code
- Using the #require macro for Swift Testing
- Vapor and Swift Testing: Running tests in parallel
- Using the #expect macro for Swift Testing
- Using Traits to annotate and customize test behavior
- Swift Testing: Writing a Modern Unit Test
Thanks!